Monday, May 8, 2017

Macross "Robotech" SDF-1 Finale

Okay, I was finally able to dedicate some time to getting this one done. I got the legs on with much difficulty. It was a very tight fit even after sanding down the areas before glueing. Since the model wasn't designed with lighting in mind, the wires barely fit through the opening. During this process I broke off the nose piece and the bridge, knocked off a foot piece and cracked the seam on the side of the main body. This is usually where I have to fight the urge to throw the whole thing on the ground in an irate fit. But I got it all fixed and pulled through.


Next up, I got the ships attached. This was a little easier than the legs, but not much! There wasn't a lot of room to solder the wires and get them stuffed into he body without causing some trouble with other wires or the LED and fiber optics inside. But I managed to get it all together while only shorting the lights out once!


While looking around the web for ideas I came across a guy who used a plain old pencil for his weathering, scraping and chipping effects. I decided to give it a try with good results!


Since that worked so well, I used a silver Prismacolor pencil for the highlights on the thruster arrays. It was way easier than masking them off and dry brushing silver paint.


Wednesday, May 3, 2017

Macross "Robotech" SDF-1 Part 3

Just a small update for today. I haven't been doing much work on this due to the death of a friend and memorials and such. Hopefully I'll get a good chunk done this coming week.

I got the bottom thrusters masked off and painted those black. I thought that the decals for the red stripes looked cheesy so I opted to paint them on instead.


I screwed up the spacing between the stripes on the two "Shoulders"; they do not match. I'm going to leave it, though. I would have to sand them down and start over completely and I just don't think its that crucial.


I did the same for the yellow stripes on the bottom thruster arrays. Because it was an afterthought (that I almost opted to skip) I had to do a lot of masking to make sure that I didn't't get any yellow overspray on anything else!


Thursday, April 27, 2017

Macross "Robotech" SDF-1 Part 2

Continuing with the Macross saga...
I did a few things out of order and had to kick myself in the ass, but I got through it alright. I really just stumble through this stuff and hope for the best.

As I mentioned before, I decided on the lighter blue "As seen on TV" color. But I wanted to add some detail and realism so I used my leftover Excelsior painting masks from Lou Dalmasso at Aztek Dummy. The camera doesn't really pick up the depth of the effect; you can see the dark and light variations under the blue in person.


I decided that I wanted to get the ships finished before doing anything else. I did some pre-shading and laid down the red Hull color. Then forgot to take any pics for the following steps until I was done!

Don't judge me too harsh, those things are tiny!


I used the paint masks to add some panel details to the command section and the "Legs". After applying Mr. Super Clear Semi-gloss I used the Tamiya Panel Line Accent Wash to add some weathering detail. For some reason I cannot find a lacquer Clear Gloss to use in this step. I had been using Future floor polish in the past, but that takes a week to harden up (most of the time). I used the Tamiya TS-79 semi-gloss on the star destroyer build and it worked just fine. A guy at my local hobby store recommended the Mr. Hobby version as it plays nicer with decals. So I gave it a shot. It seems to work but I will need to try a real Gloss on the next project to compare.


I did the same process with the masks and some grays on the white parts of the body.

Then I masked off the white areas and I did the same with the blue areas using some darker blues and grays. As before, the camera doesn't pick up the effect very well.

After the masking all came off I was not displeased!


Tuesday, April 11, 2017

Macross "Robotech" SDF-1 Part 1

Alright, here we go again! This time up it's the Revell 1/5000 "Robotech" Space Fortress SDF-1 Aka Super Dimension Fortress Macross. This is a really old 1985 re-issue of the IMAI kit from 1982. At 1/5000 scale it is really small and lacking a lot of detail.

So, my biggest dilemma is what color to paint this sucker. Everybody paints it dark blue, it's dark blue on the box and the toys were dark blue.
But it was a lighter blue on the show, as you can see here! So I think I am going to try and go with the lighter blue and attempt to simulate some tiling with color variations using the extra masks from Aztec Dummy's Excelsior masking set. 


Being this small, it was difficult to see how I could get any lights up into the bridge. The piece is solid so there really isn't any way to light up the "face". But I did manage to run some fiber optics up there as some extra antennas that will light up red at  the tips. This kit had zero detail for the main antenna arrays so I used some spare parts and built a very un-canon one. I just needed it to look more busy, so sue me. :)

I then started to drill out the main thrusters on the "feet". I wasn't sure that I could pull this off, because I thought that the plastic was too thick. To my relief, it wasn't and I was able to drill through and clean up the holes no problem.

I found some old metal grilling from an electric heater and used that for some detail in the spaces that I made. I almost went with white lighting, but once I tried blue it looked too cool, so I went with it.


Next I started on the ships, Daedalus and Prometheus. These suckers are really small!
I drilled out the elevator doors on Prometheus (the carrier) and managed to run some fiber optics as antennas like up on the main bridge. Daedalus will have some lit antennas on it's bridge boom and some lights here and there. At this scale there really wouldn't be too many lights visible, but I want to add a few for some effect. I'll show you all of that in the next installment.

Monday, March 27, 2017

Revell "Rogue One" Imperial Star Destroyer Finale

Well, its no longer a "Rougue One" Star Destroyer; It's now an "Empire Strikes Back" Star Destroyer!

I got it all buttoned up using the clips that I stole from my wife, mwah-ha-ha! Did a test to make sure it was all still working. No problems, wow.
Sometimes shit works out.


Finally got to the painting phase. Flat coat of white, sprayed on a little unevenly for some tone variation. Masked off a few panels here and there and hit them with a light gray for a bit more variation.


For the gloss coat I didn't want to use the Futurefloor wax method this time around. When using that method it takes forever for it to cure and I didn't want to wait a week. So I used Tamiya TS-79 Semi-Gloss Clear. I let that dry overnight before applying the wash. I started the wash phase with much trepidation. I can never shake the feeling that I am screwing up a perfectly good paint job. But it worked out just fine. Once that was all dry, I applied a final coat of Testor's Dull Coat and it all came together nicely.


And here it is! All done and on the asteroid base with the mini Millennium Falcon attached to the back of the tower. As always, it's not really done until it's in the red hutch!  See you on the next project, true believers!


Monday, March 13, 2017

Revell "Rogue One" Imperial Star Destroyer Part 1


I've been working on this since finishing the
Excelsior. I just haven't been keeping a running Blog on the build, so here is the catch up!

First off, although it is a model kit, it is also a toy! For some darned reason they put landing gear on it! And a speaker hole for the built in sound effects.

So, those had to go! I glued them shut, puttied them up and sanded them down smooth.
Then I got some bit of styrene to add some details, taking artistic license, of course. If you look close, you can see where they were, but Its good enough for me.


Next up I spent a few days drilling out around 700 0.5mm holes! I broke many teeny drill bits (#76) in the process because I didn't have the correct pin vise. I found the right one after completing the right side of the triangle and the hangar bays, but not before breaking 10 of them! I was, to say the least....Irate.


Then I needed a way to mount the brass pole to hold the model up, so I epoxied a piece of wood and a shim (to level it) into the belly. Nice and strong!!


While waiting for more drill bits to get here, I started to think about the display base. I got an idea that this would be one of my favorite scenes from The Empire Strikes Back, where Han Solo evades the pursuing Star Destroyer by parking his ship on the back of the conning tower. So I asked my friend Jim Frost if he could 3D print me a teeny-weeny Millennium Falcon, not much bigger than 10mm across. And he did! Thanks Jim!


A little sanding, a very small brush and some paint and I have a Falcon that can literally stop on a dime.


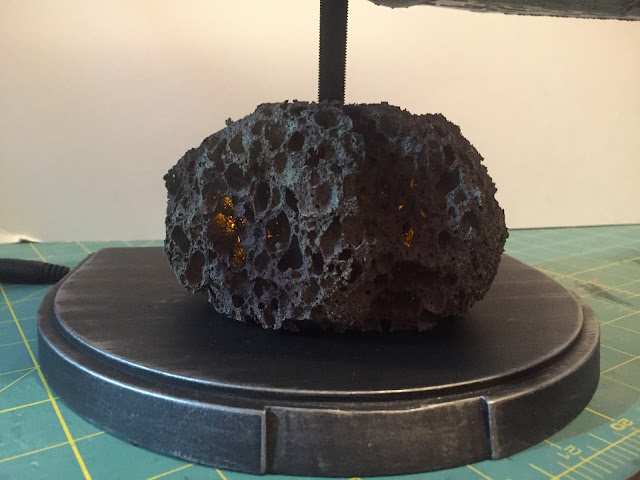
Since this will be taking place just after they exited the asteroid belt, I decided that an asteroid would be a fine addition to the base, under the ship. I drove all over the damned place looking for an actual rock big enough to do the job. Home Depot, Armstrong Garden Center, Michael's, Hobby Lobby. Nobody had any damned lava rocks. Then I saw this sponge at Hobby Lobby. That could be a rock!

"No way", says the wife.
"It will always look like painted sponge", she says.
But my mind's eye can see it as an asteroid.

Lots of Primer, let it dry. Airbrish some browns, tans, greens....mix up a burgundy red here and there and VOILA,
an asteroid! In the movie you could see flashes of light coming from within the asteroids as the ships flew by, so I will be inserting yellow candle-flicker LEDs into the sponge for that effect.


The rest of the time was wiring up LEDS and running fiber optics to all those little holes. So many fibers! I used a partial 50ft. spool that I had and a whole new 50ft spool just for the right side of the ship and the hangar bays! So I ordered another 100ft spool and almost every inch of that went into the tower superstructure! I ran out before I even got that completey done. So I have another 200ft. on the way. I hope it is enough to finish this damned thing. I'd like to get all the fibers in and get it buttoned up so that I can start painting. Stay Tuned!